by Ocean Tian Qiu
As my first post in the blog, I’d like to share some initial studies on my own Voronoi shatter plug-in. Instead of API, I only used python scripting at this point. Just attempt to show how easy it can be to create a Voronoi plug-in in Maya, and even visualize the construction of the chunks to the viewers. To add that, the cost of choosing a simple language is the slow running/performance of a tool. So API is actually always the best choice to do a user-based plug-in.
I know there’re already bunch of great shattering plug-ins such as PullDownIt, DMM, FractureFX, etc. I will still go on this topic, since these scripts are somehow basic and important to a CG technician, but rare people demonstrate it. Hope this can inspire you doing your own tools.
First I’d like to thank Eduardo Cabrera Lachuga, my friend and an excellent Houdini TD. He introduced me the ways of the object shattering, and inspired me a lot on programming my own tools.
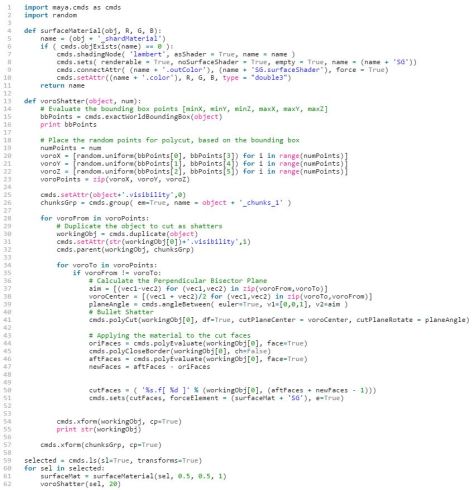
Bullet Shatter Script
Bullet shattering is one of the usual ways that scripters apply the Voronoi algorithm into maya. The normal users will also often do like this:
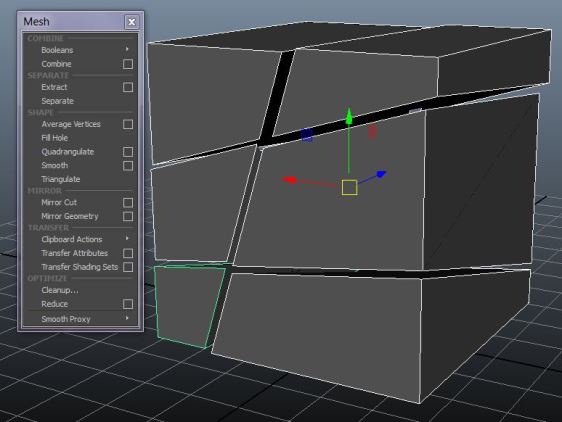
1. Go to “Cut Faces Tool Options”, Check on “Extract cut faces” and set “Extract offset” to 0 0 0, so that we can actually create double edge borders on the cut edges, in order for us to close the hole later.

2. Cut the Faces on the object, in some random directions.

3. Go to “Mesh>Fill Hole”, maya will automatically create a node called “polyCloseBorder”, which is going to create a face to close our border edges of each chunks. This is also the MEL command that we are going to use later.

4. Select the object and Go to “Mesh > Seperate”.
So if translating the user steps into the python scripting, it will be like this.

I set the random points in the bounding box and cut the object based on these points, then set the random angles for polyCut to cut, imaging there’s an actual plane to cut it off.
And it turns out successful and fast to cut an object. But it cannot shatter multiple objects (that’s an easy fix though), and doesn’t have any material assigned to the cut faces (will fix this later, since it doesn’t matter with the main shattering function at this point).

(Script Download: dropbox.com/s/870wopv65jpygsa/demonstrate_01.py?dl=0 )
Another important way to do the polyCut is: instead of checking on “Extract cut faces”, we can first duplicate the object several times as much as the number of points, and for each object we duplicate, do the polyCut with only “Delete Cut Faces” checked-on. Here’another type of polyCut that I talk about.

After closing borders for each duplicated cut objects, I could also get the chunks.
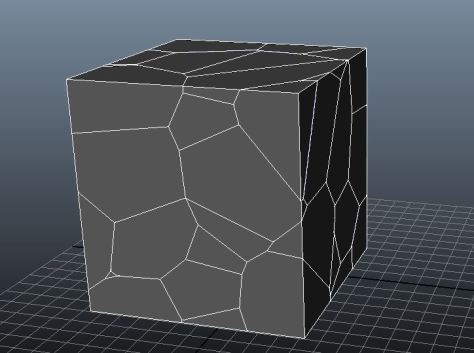
But the bullet shatter script cannot create an organic kind of shatters, and that’s why we are going to consider applying the Voronoi Algorithm into our script, since Voronoi Diagram seems more like shattered chunks.
Voronoi Algorithm
Let’s assume there are a number of random points on a plane, and we want to know in what area, its points are closest to a certain random point. And there came out the Voronoi Diagram. To calculate these areas, we have to draw out Perpendicular bisectors between any two points. And these lines define the borders of each area. The number of points is also going to be the number of chunks. This is all what we need to know for Voronoi.


Perpendicular Bisector Plane
For 3D Voronoi, instead of creating perpendicular bisectors, we consider perpendicular bisector planes for polyCut.
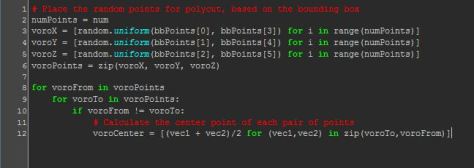
First, I placed a number of random points inside bounding box , which I did it in the last bullet shatter script. Second, I need the center points of each pair of different random points, to be the origin of the polyCut “plane”. Third, I have to find a vector which is the 3d direction of the perpendicular bisector, in order to set the plane’s 3d-world angle.
To find out the center point of each pair of different random points, we need double loops to compare them one to anthor, and a conditional statement to make sure they are not counting themselves. Formula: V0 = (V1 + V2) / 2
voroCenter = [(vec1 + vec2)/2 for (vec1,vec2) in zip(voroTo,voroFrom)]
And then I need an “aim” vector to store the each line direction of each pair of points, which has formula V0 = V1 – V2.
aim = [(vec1-vec2) for (vec1,vec2) in zip(voroFrom,voroTo)]
To find a vector which is perpendicular to the “aim” vector, I used angleBetween to compare it to the vector <<0,0,1>>. Formula: X1X2 + Y1Y2 + Z1Z2 = 1
planeAngle = cmds.angleBetween( euler=True, v1=[0,0,1], v2=aim )
So the core script is like this:

And now I am going to do the polyCut. Of the two ways that I mentioned above, actually only the second one works in this case. Let’s test them out.
Method 1) In “Cut Faces Tool Options”, Check on “Extract cut faces” and set “Extract offset” to 0 0 0. Close the borders. And seperate them out.
cmds.polyCut(object, ef=True, df=False, eo=[0,0,0], pc=voroCenter, ro=planeAngle)

After testing… It is definitly a disaster. So this method doesn’t work

Method 2) First duplicate the object several times as much as the number of points, and do the polyCut with only “Delete Cut Faces” checked-on for each object.
workingObj = cmds.duplicate(str(object))
cmds.polyCut(workingObj[0], ef=False, df=True, pc=voroCenter, ro=planeAngle)
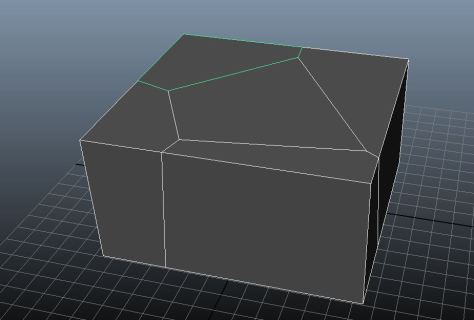
Now it works so fine. This is about to finish the core script. To add that, it’s also necessary to hide the original object and keep the chunks’ visibility on, also make a group for these chunks.
cmds.setAttr(object+’.visibility’,0) # Set the original object’s visibility off
chunksGrp = cmds.group( em=True, name = object + ‘_chunks_1′ ) # Make an empty group
workingObj = cmds.duplicate(object)
cmds.setAttr(str(workingObj[0])+’.visibility’,1) # Set the chunks object’s visibility on
cmds.parent(workingObj, chunksGrp) # Parent the chunks to the group
cmds.xform(workingObj, cp=True) # Center Pivot each chunk
cmds.xform(chunksGrp, cp=True) #Center Pivot the group

And pretty much it…
(Script Download: dropbox.com/s/p99bvio1bm6rfra/demonstrate_04.py?dl=0)
Cut Faces Material
At this point, I consider creating a material to the cut faces. Instead of directly applying to the faces, I want to write a function can create a material, and define the RGB color. So I just translate the steps we usually created materials, into the python function.

So then, we only have to use the command below to apply this material to the cut faces.
cmds.sets(cutFaces, forceElement = (surfaceMat + ‘SG’), e=True)
Now I have to define the cut faces of each chunks, which is the hardest part of this script I guess. Since computer only reorganized face numbers, we have to figure the principle out. Thinking of the cut faces, they are the new faces on the chunks. Assuming we have a cube which has six faces, and we polyCut them to half and half, with two holes, now each “chunk” has 5 faces (without closing the border). After closing the border, each chunk has the cut face and total 6 faces. So newFaces = facesBeforeClosingBorder – facesAfterClosingBorder.
oriFaces = cmds.polyEvaluate(workingObj, face=True)
cmds.polyCloseBorder(workingObj, ch=False)
aftFaces = cmds.polyEvaluate(workingObj, face=True)
newFaces = aftFaces – oriFaces
But this newFaces is just the total number of cut faces, which is not how Maya recognized the faces like “obj.f[6]”. But we know that the cut face will be the newest/largest number of the faces, after each cut.
cutFaces = ( ‘%d.f[ %s ]’ % (workingObj[0], (aftFaces + newFaces – 1))
cmds.sets(cutFaces, forceElement = (surfaceMat + ‘SG’), e=True)
Okay then the whole script is like this:
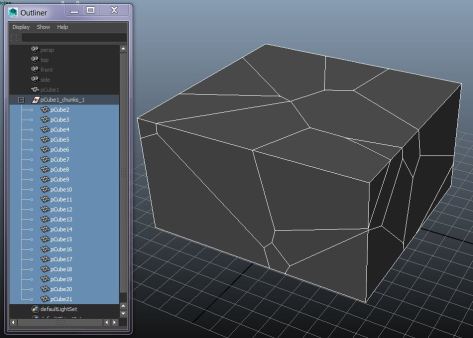
And a test:

(Script Download: https://www.dropbox.com/s/aakrsjl2l5j6rmy/demonstrate_06.py?dl=0)
Progression Bar and Visualize the Progress
At this point, I’ve already found my Maya has to generate chunks for a while, even it only has 20 pieces. The next thing is to add a progression bar to track our construncion of chunks and visualize it. To mention that, the progression bar will even slow down our shattering progress and make it even heavier, but at this point, we want to show the progress to the customers.
Here is the basic structure of the progression bar script:
cmds.progressWindow(title = “Voronoi Calculating”, progress = 0, status = “Shattering…”, isInterruptable = True, maxValue = numPoints)
cmds.undoInfo(state = False)
# Of course you don’t want user to undo any stuff in the progress of shattering
step = 0
for voroTo in voroPoints:
if cmds.progressWindow(q=True, isCancelled=True ): break
if cmds.progressWindow(q=True, progress=True ) >= numPts: break
step = step + 1
cmds.progressWindow( edit=True, progress=step, status=(“Shattering step %d of %d completed . . .” % (step, numPoints)) )
cmds.refresh()
cmds.progressWindow(endProgress=1)
cmds.undoInfo(state = True)

And after adding this to my script, it works the way I want except the slow progression.

Script: https://www.dropbox.com/s/k2eghg5uw92vmms/demonstrate_08.py?dl=0
In the next post, I will show how to make a “crack” function and a simple GUI. And see any improvement that can do.
(Please give credit to the original author when you use/quote the article elsewhere.)
